Materials & Surfaces window
 Materials
& Surfaces window is used to maintain project specific lists of material and
surface properties. It is used as an entry point to following editing windows:
Materials
& Surfaces window is used to maintain project specific lists of material and
surface properties. It is used as an entry point to following editing windows:
The primary use of this window is to prepare lists of materials and surfaces which, in cooperation with other windows, allow significant simplification and acceleration during the input of element properties for material and space boxes.
To expose this window select it from the menu View->Data Input & Entry or double click onto the respective material or surface property input field or its label in Element Editor (conductivity, diffusion resistance, transfer coefficient or transfer resistance).
Remark: Insertion of materials can be performed via Drag & Drop from Materials Database window. The Material Database can be opened by activating the Tab "Mataril DB".
Remark: The Tab "Std.Surfaces" offers standardized, non editable, surface properties (normative values).
See also: Materials window, Surfaces window, Material Database window, Element Editor, Elements 2D, Element list, Material Editor, Surface Editor
Materials window
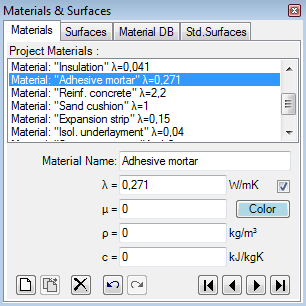 The
Materials window is used to create and maintain the list of project specific
material properties.
The
Materials window is used to create and maintain the list of project specific
material properties.
The list of materials offered in this window can be
synchronised with materials directly entered and used in the model, thus all
materials constituting the component are displayed here also.
Materials can be merged from other projects and combined in this list.
The primary use of this window is to prepare lists of materials which, in cooperation with other windows, allow significant simplification and acceleration during the input of element properties for material boxes. Materials already prepared within another project can be merged to the list also.
Upper part of the window lists materials. The bottom part - Material Editor - allows definition of material properties.
Important: Changes to material properties in the project specific materials list do not automatically propagate to properties of construction elements. Applying new material properties to selected elements must be done explicitly - either by a double-click onto a list item, via a drag-drop operation from the material list or by the bulk replacement of properties.
Remark: Additional materials can be also selected from Material Database window by drag-drop from database (Material Database can be opened from the Tab "Material DB"). Dropping some material identical to the one in the list will be inhibited.
Material list
A double-click onto a line representing material in this window results in an assignment of material properties of selected material to currently selected material elements (selected from elements list).
Also, by drag-drop operation (by dragging with the mouse), a material line can be dragged onto element editor window resulting in assignment of material properties to the element currently shown there.
Materials window can be opened either from main menu View→Data Input & Entry→Materials or from element editor by a double-click onto material name, conductivity and other material property input fields.
| Double-click left mouse button | Transfer of material properties of selected material onto
currently selected element(s) in the
element list. |
| Dragging with left mouse button | Transfer of material properties of dragged material to
material element currently edited in element
editor, or: |
| Click right mouse button | Exposes the context menu of material editing functions. |
| Click left mouse button | Selection of material from material list. Properties of selected material are displayed in Material Editor for further processing. |
Remark: If there are several elements selected (from element list) then a double-click onto the material line (or drag-drop of material line) result in the assignment of material properties to all selected elements. Such bulk element assignment has to be confirmed by the user. If within selected elements there are some of incompatible type (non material) further user confirmation is requested. Error message is shown if neither element matches the expected type.
 New New |
Appends a new material onto the end of the material list |
 Delete Delete |
Deletes the currently selected material from the list. Remark: The material is deleted from the material list only. |
 Undo Undo(Ctrl-Z) |
Undoes (reverts) the latest action(s) in the given
editing context. |
 Redo Redo(Ctrl-Y) |
Redoes (reapplies) the action lately undone in the given editing context. |
| Selects First, Previous, Next or Last material. |
Material selection
A click onto material's line in the material list selects corresponding material for further processing.
![]() Selection can be done by arrow keys or by clicking the buttons Next/Prev. also.
Selection can be done by arrow keys or by clicking the buttons Next/Prev. also.
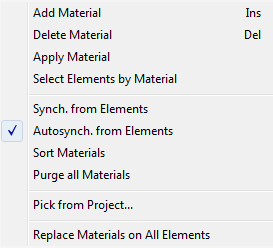
Functions of the context menu
|
Add Material INS-Key |
A new material is appended at the end of the list. |
|
Delete Material DEL-Key |
Deletes selected material from the list. |
| Apply Material |
Transfer material properties of a selected material onto
currently selected element(s) in the
element list. Remark: Visible when exactly one surface is selected. |
| Select Elements by Material |
Selects all elements in the
element list having one specific material assigend. Remark: Visible when exactly one surface is selected. Remark: For 3D-Layered models the selection operation applies only to currently active layer. |
| Synch. from Elements | Executes immediate synchronisation of material list from properties of all elements currently in the modelled component |
| Autosynch. from Elements | The synchronisation of material list from properties of all elements in the modelled component will be executed automatically (checkmark is visible) and can be turned on or off here. |
| Sort Materials | Materials will be sorted by name, λ, μ, ρ and c. |
| Purge all Materials | Removes all materials from the list |
| Pick from Project... |
Materials saved within another project will be read and
appended to the list. Remark: After importing the data from another project the (optional) bulk replacement of material properties on all elements with those just imported will be offered. |
| Replace selected Material on all Elements |
The material properties of all elements will be replaced by name with the selected one from the
current material list (bulk replacement). Remark: For 3D-Layered models the operation can apply to only the currently active layer or to all layers. |
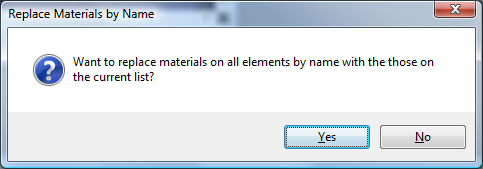
| Replace Materials on all Elements |
The material properties of all elements will be replaced by name with those from the
current material list (bulk replacement). Remark: Shall duplicate name appear in the list only the first instance in the order will be applied. Remark: For 3D-Layered models the operation applies only to currently active layer.
|
Synchronisation of material list
The list of materials offered in this window can be synchronized (extended) with materials currently in use in the modelled component, thus all materials used in the model are also displayed. This provides the ability to transfer properties directly entered in element editor to the list and have them at hand as additional entries.
Synchronisation can be explicitly requested from the context menu of the material list ("Synch. from Elements") or will automatically be executed on each element selection change when the application setting "Autosynch. from Elements" is active.
Synchronisation executes by following steps:
- All elements of modelled component are analysed.
- Material properties of each material element are extracted.
- If no such material (name, lambda, my) can be found in material list it is appended to it.
- Materials appended during this synchronisation run and appended at the end of the list are sorted alphabetically.
This procedure assures, that entries are retained in the list and only "missing" materials will extend it.
Remark: Automatic synchronisation of list contents, if active, occurs on each element selection change. Changes to element properties (in Element Editor) alone do not result in automatic synchronisation yet. Immediate synchronisation can be explicitly requested from the context menu of the material list ("Synch. from Elements").
Tip: To have the list showing only materials actually used in the modelled component delete all materials from the list (this can be quickly done with DEL-key) and then request immediate synchronisation from component's elements. Unused materials are not removed automatically from the list!
Remark: Even if values of ρ (density) and c (heat capacity) are transferred from material database, these values cannot be modified unless the licence feature HARMONIC or TRANSIENT is available (these data is not used during nor required for the steady state simulation).
See also: Element Editor, Elements 2D, Element list, Material Editor
Material Editor window
 Material
Editor is used to maintain properties of material. This window is displayed as
part of
materials window.
Material
Editor is used to maintain properties of material. This window is displayed as
part of
materials window.
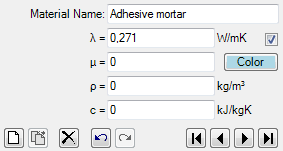
| Material Name | Name of material. It is used for documentation purpose. |
| λ (lambda) | Thermal Conductivity of the material. |
| μ (mue) |
|
| ρ (rho) | Mass density of the material. |
| c (ce) | Heat capacity of the material. |
|
Colour and AutoColour |
Provides the ability to assign any distinctive colour to the
element identifying it in graphical views and evaluations. To select the colour click onto the coloured rectangle labelled "Colour" - it will expose colour selection dialog. Remark: By default the colour is automatically assigned when change to lambda value is applied, based on predefined colour table. Removing the checkmark will turn the "auto-colour by lambda" application setting off thus assigned colour will be retained during changes to the value of lambda. |
| New | Adds a new entry to the material list and selects it for editing. |
| Delete | Deletes the currently selected material from material list. |
| Prev. | Selects previous material in the material list for editing. |
| Next | Selects next material in the material list for editing. |
Important: Changes to material properties in the project specific material list do not automatically propagate to properties of construction elements. Applying new material properties to selected elements must be done explicitly - either by a double-click onto a material list item or via a drag-drop operation from material list .
Remark: The equivalent heat conductivity of small air cavities and air gaps can be calculated with the air cavity calculator tool.
Note: You shall switch between input fields by using the TAB-key. Using that key confirms the data entry. On the other hand it provides a good alternative compared to permanent mouse use.
See also: Materials window, Air Cavity Calculator (Tool)
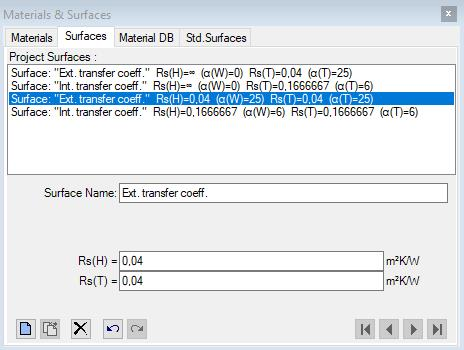
Surfaces window
The
Surfaces window is used to create and maintain the list of project specific
surface properties.
The list of surfaces offered in this window can be
synchronised with surfaces directly entered and used in the model, thus all
surfaces constituting the component are displayed here also.
Surfaces can be merged from other projects and combined in this list.
The primary use of this window is to prepare lists of surfaces which, in cooperation with other windows, allow significant simplification and acceleration during the input of element properties for space boxes.
Upper part of the window lists surfaces. The bottom part - Surface Editor - allows definition of surface properties.
Important: Changes to surface properties in the project specific surface list do not automatically propagate to properties of construction elements. Applying new surface properties to selected elements must be done explicitly - either by a double-click onto a list item, via a drag-drop operation from the surface list or by the bulk replacement of properties.
Remark: The tab "Std.Surfaces" provides a list of (read only) normative surface properties.
Surface list
A double-click onto a line representing surface in this window results in an assignment of surface properties of selected surface to currently selected space elements (selected from elements list).
Also, by drag-drop operation (by dragging with the mouse), a surface line can be dragged onto element editor window resulting in assignment of surface properties to the element currently shown there.
Surfaces window can be opened either from main menu View→Data Input & Entry→Surfaces or from element editor by a double-click onto surface name, transfer coefficient or resistance input fields.
| Surface list | List of all surface properties entered |
| Double-click left mouse button | Transfer of surface properties of selected material onto currently selected elemen(s) in the element list. |
| Dragging with left mouse button | Transfer of surface properties of dragged surface to
space element currently edited in element
editor, or: |
| Click right mouse button | Exposes the context menu of surface editing functions. |
| Click left mouse button | Selection of surface from surface list. Properties of selected surface are displayed in Surface Editor for further processing. |
Remark: If there are several elements selected (from element list) then a double-click onto the surface line (or drag-drop of surface line) result in the assignment of surface properties to all selected elements. Such bulk element assignment has to be confirmed by the user. If within selected elements there are some of incompatible type (non space) further user confirmation is requested. Error message is shown if neither element matches the expected type.
| New |
Appends a new surface onto the end of the surface list |
| Delete |
Deletes the currently selected surface from the list. Remark: The surface is deleted from the surface list only. |
| Undo (Ctrl-Z) |
Undoes (reverts) the latest action(s) in the given
editing context. |
| Redo (Ctrl-Y) |
Redoes (reapplies) the action lately undone in the given editing context. |
| Selects First, Previous, Next or Last surface. |
Surface selection
A click onto surface's line in the surface list selects corresponding surface for further processing.
![]() Selection can be done by arrow keys or by clicking the buttons Next/Prev. also.
Selection can be done by arrow keys or by clicking the buttons Next/Prev. also.
Functions of the context menu
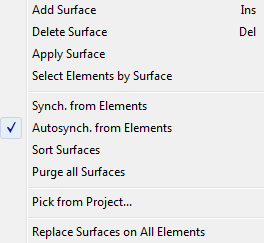
| Add Surface INS-Key |
A new surface is appended at the end of the list. |
| Delete Surface DEL-Key |
Deletes selected surface from the list. |
| Apply Surface | Transfer surface properties of a selected surface onto
currently selected element(s) in the
element list. Remark: Visible when exactly one surface is selected. |
| Select Elements by Surface | Selects all elements in the
element list having one specific surface assigned. Remark: Visible when exactly one surface is selected. Remark: For 3D-Layered models the selection operation applies only to currently active layer. |
| Synch. from Elements | Executes immediate synchronisation of surface list from properties of all elements currently in the modelled component |
| Autosynch. from Elements | The synchronisation of surface list from properties of all elements in the modelled component will be executed automatically (checkmark is visible) and can be turned on or off here. |
| Sort Surfaces | Surfaces will be sorted by name and alpha. |
| Purge all Surfaces | Removes all surfaces from the list |
| Pick from Project... | Surfaces saved within another project will be read and
appended to the list. Remark: After importing the data from another project the (optional) bulk replacement of surface properties on all elements with those just imported will be offered. |
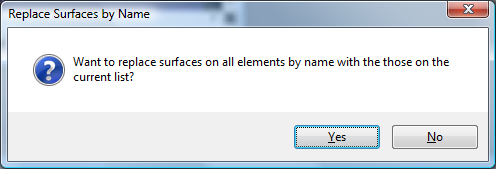
| Replace Surfaces on All Elements | The surface properties of all elements will be replaced by name with those from the
current surface list (bulk replacement). Remark: Shall duplicate name appear in the list only the first instance in the order will be applied. Remark: For 3D-Layered models the operation applies only to currently active layer. |
Synchronisation of surface list
The list of surfaces offered in this window can be synchronized (extended) with surfaces currently in use in the modelled component, thus all surfaces used in the model are also displayed. This provides the ability to transfer properties directly entered in element editor to the list and have them at hand as additional entries.
Synchronisation can be explicitly requested from the context menu of the material list ("Synch. from Elements") or will automatically be executed on each element selection change when the application setting "Autosynch. from Elements" is active.
Synchronisation executes by following steps:
- All elements of modelled component are analysed.
- Surface properties of each space element are extracted.
- If no such surface (name, α, Rs) can be found in surface list it is appended to it.
- Surfaces appended during this synchronisation run and appended at the end of the list are sorted alphabetically.
This procedure assures, that entries are retained in the list and only "missing" surfaces will extend it.
Remark: Automatic synchronisation of list contents, if active, occurs on each element selection change. Changes to element properties (in Element Editor) alone do not result in automatic synchronisation yet. Immediate synchronisation can be explicitly requested from the context menu of the surface list ("Synch. from Elements").
Tip: To have the list showing only surfaces actually used in the modelled component delete all surfaces from the list (this can be quickly done with DEL-key) and then request immediate synchronisation from component's elements. Unused surfaces are not removed automatically from the list!
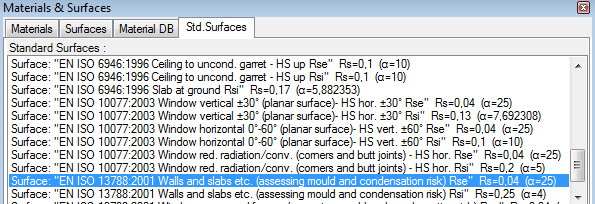
Standardised surface heat transfer coefficients
The tab "Std.Surfaces" provides a list of (read
only) normative surface properties (standard values of Rsi and Rse).
You can find these
reference values within the description of U-Value calculator.
Important: While assessing heat loss different values must be used within the component model as those for the mould and condensation assessment! That means you will have to adjust respective Rsi and Rse values depending on the assessment type.
See also: Element Editor, Elements 2D, Element list, Surface Editor window
Surface Editor window
 Surface
Editor is used to maintain properties of surface. This window is displayed as
part of
Surfaces window.
Surface
Editor is used to maintain properties of surface. This window is displayed as
part of
Surfaces window.
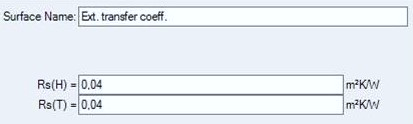
| Surface name | Name of surface. It is used for documentation purpose. |
| RS | Defines the thermal transfer resistance of the
surface. RS = 1 / α |
| New | Adds a new entry to the surface list and selects it for editing. |
| Delete | Deletes the currently selected surface from surface list. |
| Prev. | Selects previous surface in the surface list for editing. |
| Next | Selects next surface in the surface list for editing. |
Important: Changes to surface properties in the project specific surface list do not automatically propagate to properties of construction elements. Applying new surface properties to selected elements must be done explicitly - either by a double-click onto a list item or via a drag-drop operation from the surface list.
Note: You shall switch between input fields by using the TAB-key. Using that key confirms the data entry. On the other hand it provides a good alternative compared to permanent mouse use.
See also: Surfaces window, Alpha (surface transmittance) hidden (application setting)
Materials Database window
Material Database contains materials from DIN, ÖNORM, ETU, IBO, BPHDB.COM, Baubook/öbox, ArchiPHYSIK and ECOTECH. This window will be opened from the menu View→Data Input & Entry→Material Database and from the menu Tools→Materials Database. The main application's menu is extended with "Materials DB" menu.
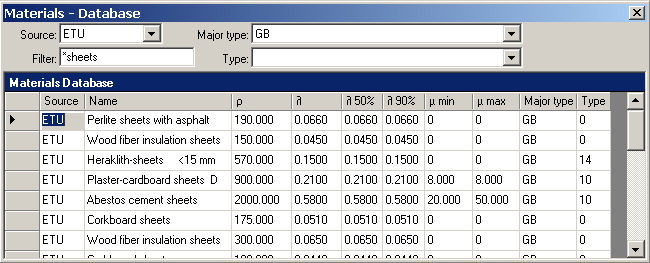
By selecting required filter criteria (Source, Major type, Type and Name filter) one can reduce amount of shown materials to those currently searched for. The filter setting is retained between application executions (will be saved together with application settings).
![]() The
context menu provides a command to reset the filter criteria (Source, Major type, Type
and Name filter) thus showing all available data without any filtering.
The
context menu provides a command to reset the filter criteria (Source, Major type, Type
and Name filter) thus showing all available data without any filtering.
A double-click onto a data selector (left to data fields) will
assign material properties to currently selected material element(s) of the
model. Such assignment can be executed by a drag-drop with the right
mouse button also - see below.
| Source | Provides the selection of shown materials by their data
source. If empty entry is selected data from all sources is shown. |
| Filter Name-Filter |
Provides the selection of shown materials by a substring contained in their name (e.g. Brick). |
| Major Type | Provides the selection of shown materials by their major
type. If empty entry is selected data of all major types is shown. Remark: List of available major types is source specific. |
| Type | Provides the selection of shown materials by their type. If empty entry is selected data of all types is shown. Remark: List of available types is source specific. |
| Material list | Displays a list of materials in the database, possibly filtered according to selection criteria specified by Source, Name-Filter, Major type and Type. |
| Double-click left mouse button onto data record mark | Transfers material properties of the selected material onto
currently selected element(s) within
element list |
| Dragging with left mouse button out of data record mark | Transfer material properties of the material dragged with
the mouse onto the element being currently edited in
element
editor or: Transfer material properties of the material dragged with the mouse onto the element(s) currently selected within element list or: Insert the material dragged with the mouse into the project own material list |
| lick left mouse button | Selection of a material |
Remark: If there are several elements selected (from
element list)
then a double-click onto the material line (or drag-drop of material line)
result in the assignment of material properties to all selected elements. Such
bulk element assignment has to be confirmed by the user. If within selected
elements there are some of incompatible type (non material) further user
confirmation is requested.
Functional details summarized:
- Drag-Drop of material into material window: Drag-Drop with right mouse button from record mark (left to data fields).
- Drag-Drop of material into
element editor: Drag-Drop with right
mouse button from record mark (left to data fields).
Remark: A Drag-Drop of a material onto element editor is only possible if edited element is of sufficient type (material box). - Drag-Drop of material onto element list or Elemente2D window: Drag-Drop with right mouse button from record mark (left to data fields).
- Double-click onto a data record mark (left to data fields)
Remark: Drag-Drop is being initiated with right mouse botton out of data record mark (left to data fields).
Remark: For technical reasons there are some columns hidden from the user. While tabbing between the fields the text cursor might hide also - simply press the TAB key again to reveal the focus.
Remark: Materials database data is stored within the file "Baustoffe.xml" within installation folder of the application and is loaded during this window is opened. You can modify this file within Excel or text editor if required.
Remark: If Baubook/öbox-Data or BPHDB.COM-data is available within the Download-Folder it will be loaded during this window is opened (the load operation might lead to slight delay before the window is displayed).
Materials DB menu
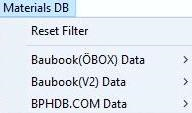 While
the Materials Database window is
focused the main menu of the application is extended with the window specific
menu
"Materials DB":
While
the Materials Database window is
focused the main menu of the application is extended with the window specific
menu
"Materials DB":
| Reset Filter | Reset the filter criteria (Source, Major type, Type and
Name filter) thus showing all available data without any filtering. |
| Baubook(ÖBOX) Data | The menu specific for management of baubook(öbox) material data |
| Check for Updates... | A test for updated data against the Baubook/öbox server is initiated via internet connection |
| Download Updates... | A test for updated data against the Baubook/öbox server and a download (if new data is available) is initiated via internet connection |
| Include Baubook(ÖBOX) Data | Include baubook(öbox)-data (if available) within material database window. This, if turned off, allows you to exclude baubook(öbox)-data from the view even if the baubook(öbox) data file is available. |
| BPHDB Data | The menu specific for management of BPHDB.COM data |
| Check for Updates... | A test for updated data against the BPHDB.COM server is initiated via internet connection |
| Download Updates... | A test for updated data against the BPHDB.COM server and a download (if new data is available) is initiated via internet connection |
| Include BPHDB Data | Include BPHDB.COM-data (if available) within material database window. This, if turned off, allows you to exclude BPHDB.COM-data from the view even if the BPHDB data file is available. |
Remark: To execute an update check or the download of Baubook/öbox or BPHDB.COM data an internet connection is required.
Remark: Downloaded data will be saved to the
Download-Folder specified within application settings.
See also: Element Editor, Materials window, Baustoffkatalog ON V 31, Material Database Baubook/ÖBOX, Material Database BPHDB.COM, Material Database ArchiPHYSIK (APH), Material Database ECOTECH