Completing the Component
To move on to input of the remaining elements, click New on Elements Browser or Box Editor window. The screen should then appears ready for input of element 6, now empty or a copy of the last element.
The next sequence of four overlapping elements describes the girder part of the aggregate:
elem. 6, ext. plaster:
X_1:  45
X_2: 405
Y_1: 695
Y_2: 1200
elem. type :Material
material: exterior plaster
After having x1,x2,x3,x4 entered and selecting the type of "Material Box", instead of entering material data, simply double click the "interior plaster" in the "Materials" window. The material data is being copied into the fields.
By double-clicking a material in Materials window while a material box is selected, you assign the material data to the currently selected material element.
Note: you can also drag a material from Materials window onto the Box Editor to achieve the same result.
Note: If the Materials window is hidden or not shown you can reveal it by double-clicking the label "Material Name" or "Lambda" or the accompanying data entry fields (shown when element type is "Material Box").
Continue with the data entry and assignment of material properties as follows:
elem. 7, ext. insulation:
X_1: 50
X_2: 400
Y_1: 700
Y_2: 1200
elem. type :Material
material: insulation
elem. 8, adh. mortar:
X_1: 120
X_2: 330
Y_1: 770
Y_2: 1200
elem. type :Material
material: adhesive mortar
elem. 9, reinf. concrete:
X_1: 125
X_2: 325
Y_1: 775
Y_2: 1200
elem. type :Material
material: reinf. concrete
Elements 10 through 13 describe the same sequence of materials for the insulated concrete floor slab construction connected to the girder:
elem. 10, ext. plaster:
X_1: 400
X_2: 1525
Y_1: 895
Y_2: 1200
elem. type :Material
material: exterior plaster
elem. 11, ext. insulation:
X_1: 400
X_2: 1525
Y_1: 900
Y_2: 1200
elem. type :Material
material: insulation
elem. 12, adh. mortar:
X_1: 400
X_2: 1525
Y_1: 1020
Y_2: 1200
elem. type :Material
material: adhesive mortar
elem. 13, reinf. concrete:
X_1: 325
X_2: 1525
Y_1: 1025
Y_2: 1200
elem. type :Material
material: reinf. concrete
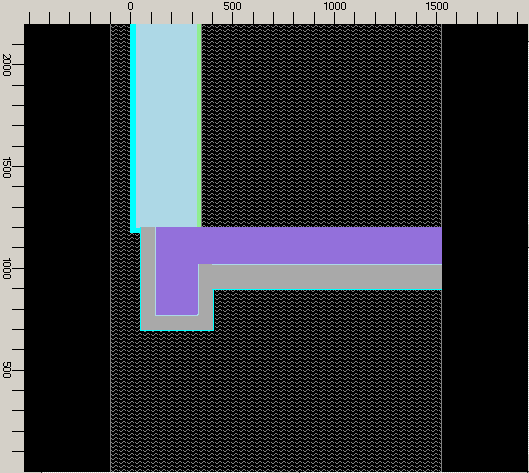
The interior flooring over the concrete slab is built up with the last five elements of the aggregate:
elem. 14, sand:
X_1: 345
X_2: 1525
Y_1: 1200
Y_2: 1310
elem. type :Material
material: sand
elem. 15, exp. strip:
X_1: 345
X_2: 1525
Y_1: 1220
Y_2: 1310
elem. type :Material
material: exp. strip
elem. 16, isol. layer:
X_1: 349
X_2: 1525
Y_1: 1220
Y_2: 1310
elem. type :Material
material: isol. layer
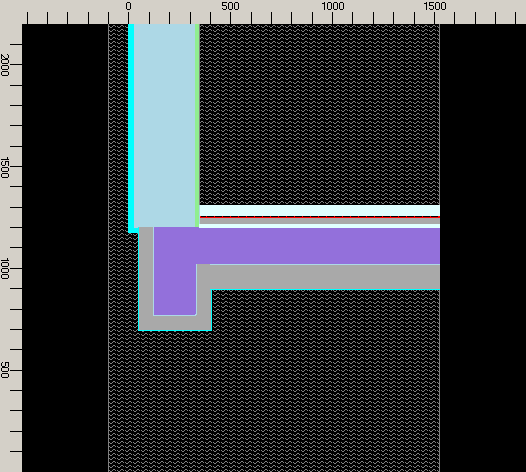
elem. 17, concrete (then wrapped with heat/power source):
X_1: 349
X_2: 1525
Y_1: 1250
Y_2: 1310
elem. type :Material
material: concrete topping
The concrete shall also be attached to the power source (heating source). This is being done by wrapping the assigned are by the Power Box type of a element - as described in the reference, a Power Box has not interior, it does wrap interiors of Material Boxes.
To get exactly the same rectangle assigned to the next element as that of element 17, select Duplicate from the context edit menu (by right-clicking either at the last element in Element Browser or right-clicking over Box Editor an selecting Duplicate)
elem. 18, concrete wrapper with heat/power source:
X_1: 349
X_2: 1525
Y_1: 1250
Y_2: 1310
elem. type :Power Box
power name: concrete
TAB to Box Type and change the entry to "Power Box". The TAB to Power(source) name and enter "concrete" thus naming the Power Source Boundary Condition which can later be assigned with Power.
After confirming the entry of this Power Source continue with the last material element:
elem. 19, concrete topping:
X_1: 349
X_2: 1525
Y_1: 1260
Y_2: 1310
elem. type :Material
material: concrete topping
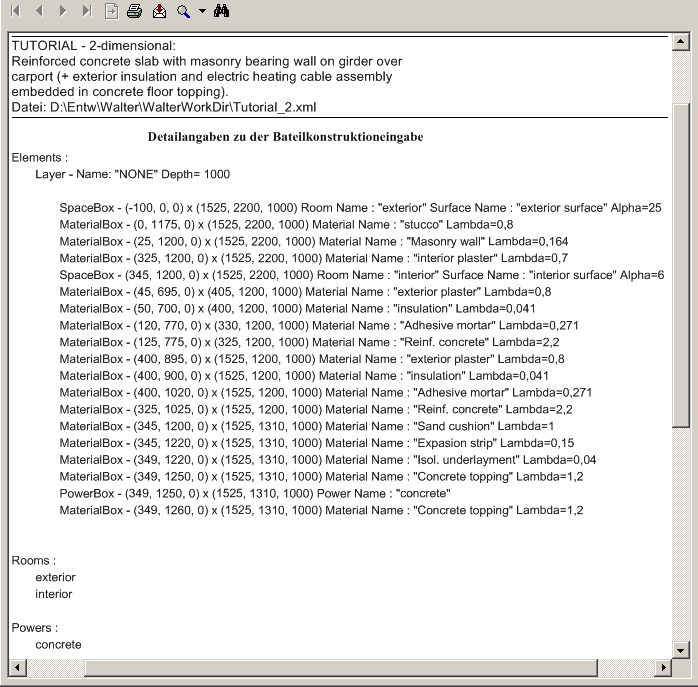
This conclude the entry of the two dimensional model.
To verify the input, select View→Windows→Data-Entry Report and check details of the input.
On main menu click on File→Save, enter the name of the file you want the project to be saved in (e.g. MyTutorial) and confirm the write operation with Ok.
Continue reading with "Obtaining basic results" ...